Thursday, October 27, 2011

It's the best time of year...

...and no, I'm not talking about Christmas. I adore holidays of all kinds, but, besides birthdays, I have to say Halloween tops the list at our house. Come on, you get to dress up and get free candy! And yes, I do dress up (and yes, my kids get the candy, but it's so fun to watch them!).

As a craft addict, Halloween seems to be the ultimate outlet for my creativity. Plus it's an opportunity for me to tap into one of my passions: movie costumes. If somehow I could live two lives, my second life would be as a costume designer. Ah, the fabrics, the hairpieces, the jewelry, the colors, the way it all comes together to blend into the world within the movie. I love it!

So the last few weeks I've been working hard on our costumes this year, and I love the way they turned out! So please pardon while I do a little Halloween preview...

We've been Star Wars characters the last couple of years, so I felt like it was time to do something new. I already have a Lord of the Rings-ish elf costume, so I wanted to go with that this year. Since there are no cute little babies in the film, my baby gets to be a cute little elf only loosely tied to the theme.

babyelf2

I used the same sewing pattern for both the kids -- it included some Renaissance-style dresses and a knight's outfit. I had to cut this down for my girlie; the smallest size was 3 and she's in 18 months. I did this by cutting the pieces out inside the smallest size lines, and then I used a generous seam allowance when I put it together. I then tried it on her -- it fit farely well, just had to take some extra in on the shoulder seam and consequently adjust the shoulder hole.

babyelf4

I also used my serger to make a fancy edging on the sleeves and along the bottom. It definitely cut off a lot of time trying to hem the odd shapes on Renaissance sleeves and the rounded dress.

babyelf5

I also practiced doing French seams on the sleeves and this little cloak I made. Both were sheer fabrics, so this was an elegant, professional way to do the seams without raw edges hanging out. French seams are really easy, too! I just looked it up on YouTube.

For my son, I've been wanting to make this costume for a few years. He's my favorite character from the movie!
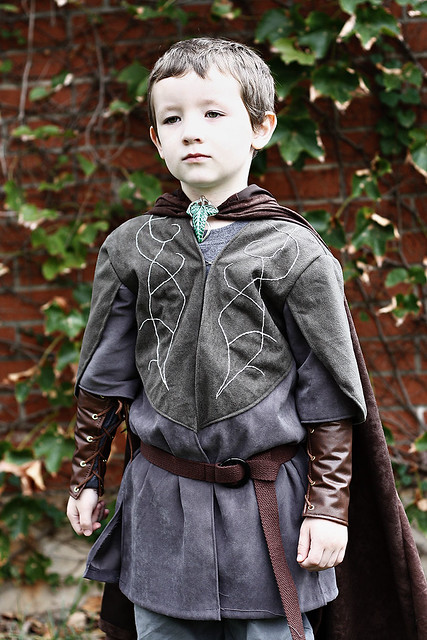
legolas1

I had so much fun doing this one! The only thing he's missing is a blond wig; he does have a bow, just didn't bring it to this Halloween party.
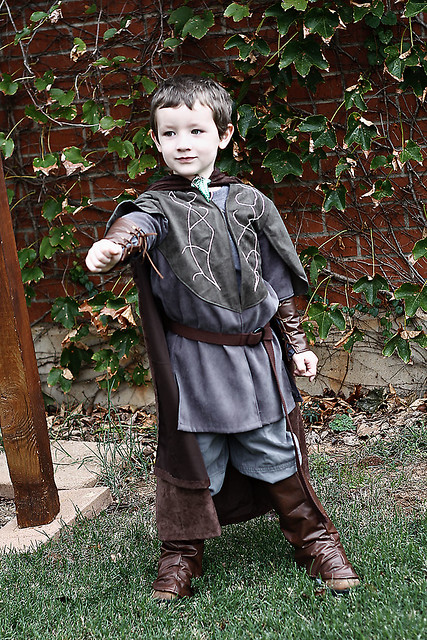
legolas2

I used the knight's tunic pattern to make the jerkin  and simply had it open in the front instead of the back. NOTE: If you're going to do this, remember to add a little extra to the edges. Cutting it in half and then hemming along the front cut too much into tunic; luckily it was big enough, but it does pull toward that middle instead of laying with the side seams where you want them.

I then added the green parts on the front, across the back and on the sleeves. I used the same pattern to make the boot covers and put snaps on to close them in the back so I can easily adjust the size and he can wear them for a few years. The arm braces were going to be closed with velcro, but I realized I made them too small. So I used my leather punch from this tutorial, and put eyelets in evenly on both sides and laced them up with suede cord I found in the jewelry aisle at the store. I can also use the arm braces for several years because they're adjustable.

My hubby will be a ring wraith -- I'll share next week!

Tuesday, October 11, 2011

Add a little rock'n'roll to your wardrobe...

I have been on a jewelry kick lately -- I love jewelry, so why not learn to make my own? I've made a necklace and some earrings so far, and I'm definitely hooked! So much fun...

But I have to say what I've been dying for most is a punky, rock'n'roll leather cuff, and I'm so excited with the results! (Just don't look too close, it's definitely not perfect, but it was my first time working with leather...)


Yeah, I know. Not the most edgy looking with my wedding ring, but I had to wear it on that arm so I could take a picture. :) But still, I think it looks pretty awesome for my first attempt!

This was actually a pretty simple project; I did it in one afternoon. First, pick up some materials at the craft store. I saw leather and embellishments at both Hobby Lobby and Michael's. I bought a piece of leather ($3) and some embelishments ($3 to $7). Both rivets and these pyramid brads looked so much fun!


Now, this isn't the cheapest project, because you'll need more than just the materials. I also bought some snaps (and fyi, both the snaps and the rivets come with what you need to set them, you just need a hammer -- $7.50 but used a coupon), a leather hole punch (which was about $8 but I used a 40-percent coupon), and a needle/leather awl ($2). I used the awl for the pyramid cabuchons, but you will only need the leather punch for the rivets. You can make at least three or four cuffs from the leather, and you'll have leftover rivets, cabuchons and snaps. So this will be more cost effective if you make several -- hey, it's a good time to get started on Christmas presents!

So to start, you need to take some measurements and do some designing. I did a Google search and looked at leather cuffs, then designed my own with inspiration from what I found. I decided I wanted three horizontal strips and I wanted to use the pyramid cabuchons and alternate them. So plan what you want it to look like, then determine your width based on that. I decided to have each strip be 3/4 inch, so my width was 2 1/4 inches.

Measure your wrist (my wrist was 6 inches around), then add 2 inches so you'll have enough to wrap around. And believe me -- you'll need 2 inches (I tried only 1 inch and it wasn't enough). Your arm is a little bigger further up, so you need enough for the widest part of your arm, and you'll want a decent amount for placing your snaps. So my length was 8 inches. Using a rotary cutter and a straight-edge ruler, cut out your cuff (2 1/4 inches by 8 inches for mine).


Then mark any specific design elements you need to cut using a pen. I tried a pencil and it totally didn't work. You can do it on the back so you won't see it anyway, so go ahead and use the pen. I measured where to make my cuts so I could have three horizontal strips at 3/4-inch each.


See what the pencil did for me? Nothin'! My strips ended up crooked because I couldn't really see them. I just used my nice sharp scissors to make the strips. I also rounded the corners using my scissors.


Now you'll need to plan out where to put your embellishments. If you're making a hole to put the embellishment in, you can put your pen marks on the front because they'll be cut out, but if you're doing something more like these brads, I suggest you lay them out and mark it on the back.


If you're doing rivets, grab your punch and go to town. For these brad cabuchons, I used this awl. I didn't like the way the punch looked; even the smallest hole was too much of a circle for these and then it looked lumpy when I put it in. Now be so careful! This awl was super sharp! I pushed it into the leather where I wanted it and really wiggled it around to get it in. Then I flipped everything over so the base of the awl was on my matt and the leather on the top of the awl and -- carefully -- pushed the awl up through.


As you can see, this method kind of stretched my leather out. It looks all lumpy laid out, but it won't matter much when you've got it around your wrist. So get your embellishments all in place...


... then wrap it around your wrist to mark the spots for your snaps. Again, use a pen, and you'll use the leather punch here, so the pen marks will get punched out.


I just eyeballed how much I wanted it to overlap and how good it looked on my arm so I had plenty of leather to support them. Make sure to mark the holes for both ends.


I used my hole punch, making sure to get the punch that was the same size as my snaps so it had a nice, snug hole.


Then I simply followed the directions to put the snaps in, using the little setter and anvil and just a hammer I had around the house. So here's your fasteners -- and that's it!


A nice leather cuff full of attitude! Sweeeeeeeet...

Thursday, October 6, 2011

Something for your bling with a twist...

As promised, here's a little fancier version of a jewelry organizer, this one more all-in-one.


This was my friend Keri's idea, and it's brilliant! I made this as a birthday present for my sister-in-law.

You'll need these items:
*a shadowbox frame (a frame with kind of a door on it, deep enough to put things inside -- a wood one)
*fabric
*hot glue gun
*staple gun (optional)
*fiberglass screen
*pushpins


(Sorry, I know I'm using the same pics again, but you don't mind, do you?)

I bought my shadowbox at Hobby Lobby -- even half off it wasn't as cheap as I had hoped, but it really worked well for the project. It also had hardware to sit on a dresser instead of hanging on the wall, just fyi. I bought the screen at Home Depot behind the windows department along the back wall. And I bought these awesome wood pushpins at The Container Store, and then they were too big for my project. :( So I ended up buying some rounded-head pins at Target.

Again, this method is really easy -- you could have this done in an afternoon! First, ditch the glass or plastic. You won't need it.

Next, take out the back/inside of the frame. Mine had a styrofoam pad attached to the back, and I tried to cover it wth fabric without taking it apart. That totally didn't work, so don't be afraid to take it apart! If your shadowbox doesn't have some kind of pad, then I suggest you get one or it won't hold your necklaces and/or bracelets.


I cut my fabric a little generously so I would have plenty to work with (so maybe an inch, inch and a half beyond the edges of my back and foam pad).

Warm up your glue gun and you'll attach the fabric to the foam, and then glue it to your backing.


My pad was glued to the back, and then there were screws through the backing and foam to the frame. When I glued my fabric down, and then glued the foam onto the backing, I tried not to put glue over where the screws needed to go.


Now you'll cut your screen just a bit bigger than the front of the frame and you'll staple it or glue it in place, basically replacing the glass or plastic with the screen.


Now, it was a little funky doing this part because these hinges didn't allow the frame to lay flat open. I just propped the back up so the front part could lay flat while I stapled it in place. I started with one side, got it stapled down, the really stretched the screen as I stapled the opposite side, then continued to pull as I did the two short sides. I didn't get it to lay perfectly flat and taut, but that's ok. It will still look great if you can't get it as tight as you want.

Finally, trim the excess screen and put your back piece back into its place. Then put some pushpins where you want in the fabric-covered foam and hang your necklaces or bracelets on them. Close the front and put your earrings through the screen holes and enjoy!