Monday, December 5, 2011

A little twist on a favorite classic...


I'm not a big wreath person; somehow they always turn out too traditional and, well, boring to me. But I found some wreaths on etsy that just blew me away and I had to try and make one...

I love argyle prints, so I fell in love with it on a wreath, and the fact that the wreath was wrapped with yarn? Sold...

I decided to make a team one as a Christmas gift (eh? eh? great gift idea right here)... And as hard as it looks, it really didn't take me forever like I thought it would.

I actually did this kinda on my own, but later found a good tutorial on it here. I used a 12" styrofoam wreath, and it was really easy to wrap. And just a tip -- leave the yarn on the skein. It's much easier to throw a ball of a yarn through the wreath than trying to pull a really long string through over and over and over...

Then I made the little diamonds. For a 12" wreath, my diamonds were 1.75 inches tall and about 2.58" wide. They lined up almost perfectly. Then I used the black yarn to wrap around one direction, coming up and across my diamond, then wrapped it back the other way to make the argyle pattern.


I used hot glue to tack down all my yarn ends and my felt.

I printed an O and a U off on my computer in Freshman font, then used them to make my letters. I hot glued those onto the crimson and cut it out. I put some plastic mesh (found in the embroidery aisle at the craft store) onto the back of that to give it some structure, then added a second layer of crimson felt so you wouldn't see it. With that all sandwiched together, I just hot glued it to the wreath.


Then I made some felt flowers, following this tutorial again as well as a combination of this one and this one.


I used lots of hot glue on those babies as well, and that's it. Well, I did also include something to hang this with (although my clear over-the-door one fit perfectly, but it's not for me...). I just took nine strands of yarn and braided them together; I wanted it to be thin enough not to detract from the wreath, but I wanted it to be interesting at the same time. I really love it! Fun way to show some team pride...

Wednesday, November 23, 2011

Happy Thanksgiving...

Yeah, I love eating too much good food! I hope y'all have a wonderful holiday week. And I'm sorry; I know I'm not very consistant at posting here. I'm really trying to be, and I have so many wonderful things I want to share, so I hope you'll come back soon. I'm going to try posting on Mondays, but I expect things to continue to be a little spotty through the Christmas holiday... So come see me on Mondays in January and enjoy your holidays! Thanks for reading...

Friday, November 18, 2011

A new little buddy...

I've had this little project in the works for a long time, but other things keep getting done first, like presents for this shower or this birthday. But I've finally got my priority projects out of the way, and a big incentive to do some extra sewing -- I finally upgraded the old sewing machine! The old girl was fine but my skills had outgrown her capabilities, and my new one is, well, it's smarter than me! I'm having lots of fun trying it out...

And I'm so glad I finally got this done, because it is *singing* awe-some! And best of all, super quick. :)


And what is this cute little envelope thing? It's my new buddy, my crochet buddy...


Getting everything organized just makes me so happy, and best of all, it put some of my small scraps to good use. All my hooks, nestled in their little pockets, easily found for any project and no longer lumped in the pocket of my yarn bag.


And my scissors fit right in the fold, not sitting in my bag where the baby always seems to find them (yikes! gives me a heart attack every time!).


I even put a nifty little pocket in there for my needles. Love it...

All you need for this project is some scrap fabric, Velcro and bias tape. *Please note on the bias tape: Not sure why I didn't make sure what I was buying when I bought it, but make sure to get the stuff that says "extra wide" and "double fold" on it. It's the stuff that's already folded in half and wide enough for projects like this. I kept going through my scraps and finding the skinny, single-fold stuff that you have to fold in half yourself and turns out super narrow when you do...

Here's the sizes for your pieces:


Sorry, should have ironed that pocket... Anywho, you should have six pieces total: one pocket, one needle pocket (optional), two flaps and two main pieces, one for the inside and one for the outside.

This pocket is sized for about 10 hooks. It depends on the size of your hooks and how many you want, but I ended up with room for 11, sized D through N.

First thing we'll do is the pocket for all your hooks. Fold your pocket in half, right sides together, so it's 8 inches wide and 4.5 inches tall.


With a 1/4 inch allowance, sew one side shut. Yes, just one side...


Then trim the corner on the folded end, and turn the pocket right side out, using something to push out that corner from the inside, making it nice and crisp.

Then place the pocket on the inside piece (on top of the right side), lining it up with the bottom left corner.


Sew it in place along both of the sides, sewing as close to the edge as possible.


Now grab a ruler and fabric marker/pencil. You're going to mark your lines for your hook slots. I was going to have them go from small to big, but I messed up on my markings and didn't want to have to redo them, so my big pockets are mixed in with my smaller ones. But I kind of like it. Either way, for my bigger hooks -- sizes I, J, K -- I made the pocket 3/4". For my biggest, N, I made it just a bit bigger than 3/4". For all the others, I made them 1/2".


Now sew along your lines, making sure to back stitch.


Next we'll do the flap. Grab your two flap pieces and put them together, wrong sides together and right sides out.


Now you're going to round the corners. Having them placed right on top of each other, fold them in half so the short ends are together and use your scissors to round the bottom corner (this way your corners will be the same). You can just eyeball it -- we're going to put bias tape around the edges. If you like doing corners with your bias tape, fell free to leave your flaps rectangular.


Leaving the flaps with wrong sides together, you'll sew bias tape around the short ends and bottom. You'll just open the bias tape and place the edge of the fabric snug in the fold of the tape and sew in place. The rounded corners allow you to keep going without having to stop and fold the tape into making a corner, but you'll still have to do a little bit of finageling (spelling?) with the bias tape around the corners. It was also helpful for me to stop, anchoring the project with my needle by putting it down, lift my presser foot and adjust the fabric around the curved spot.


And see? I still had a little bit of folding around the curves, but just a little. Nothing like doing full-out corners.

Now we need to shape the inside piece. You'll fold it with the hook pocket folding side to side, and the leftover will make the flap for your envelope. Again, you can leave this square if you want to do corners with your bias tape, but I rounded it to make it easier for me.


Set that aside and grab your needle pocket, if you're doing one. You'll also apply bias tape along the top of your pocket.


You can trim the bias tape flush with your pocket because the edges will be folded under. Also fold the bottom of the pocket where you want it and pin it (or you can press it in place -- I was just being lazy/quick).

With the bottom fold in place, you'll figure out where you want your pocket. This is important to line up if you're doing a rounded flap like me, because you don't want it to hang off. So figure out where you want it on your inside piece, then flip it to the left, so its right side is down, and try to keep that left side about where you want your pocket to start.


Next, sew along what is now the right side of the pocket, making sure the bottom fold gets stitched into place as well.


Now you'll fold the pocket back over toward the right, so now you're looking at the right side. Your stitching should hold the bottom fold in place, for the most part, and I just folded under the other side and quickly slid it under my presser foot. I held the fold in place as I stitched it down, but if it's giving you problems, you can iron the fold into place and then sew. I started at the top, right corner, sewed down the side, along the bottom and up the other side. I know the last side was already sewn down, but this gave the pocket a nice, top-stitched look all around instead of just on the side and bottom.


Now you'll put the inside on top of the outside, wrong sides together. Also put the flap in place, and pin everything down. Trim along the sides so all the pieces match exactly along the edges.


Now, if you want to close your envelope with Velcro and you're set on machine-sewing it down, do it here. You'll unpin the two pieces and put your Velcro (the hard, pokey part) on the outside piece, approximately 2 to 2 1/2 inches down from the edge (on the left side, not the rounded side). I somehow always get my pieces placed weird, so I waited and handstitched it in place later.

Now you'll put bias tape around the edges. To make this a little easier, I did a separate piece for the straight edge, then did another piece around the rest.


So here's my piece for the straight edge. I trimmed it exactly with the edges and then sewed it in place.

Then for the rest, I started out by trimming the end of my bias tape into a point, like this...


Then I fold it under before I fold the tape in half. This way you won't have pieces sticking out from your corner and it sits nicer without the extra bulk. I put the fabric edge right into that middle fold and sewed along. Again, I opted for the quicker/lazier way and didn't pin this one in place. But this was easier for me along the rounded edges.

TIP: As you do the rounded edges, open the bias tape and place the bottom half into place against the edge under the rounded part, then using your fingers to keep it in place, fold the top half down. This seemed to be an easier way to make the bias tape conform to the curve of the fabric instead of the fabric bunching to conform to the bias tape. Remember, bias tape has an incredible amount of stretch and should do the stretching instead of your fabric.

Then when I got close to the end, I trimmed this end into a point and folded in under, then folded it in half around the fabric, making sure everything fit in a nice corner and I didn't have any hanging over the end.


Then the last thing to do is the Velcro. I used the small, circular, adhesive ones. You'll place your soft-feeling Velcro in the center of the rounded edge (inside piece) and can machine-stitch into place. If you've already stitched your other Velcro in place, make sure to fold your crochet buddy so you can place the Velcro so it fits together well.


I had placed this one first, so after I had this stitched, I then folded it and placed the other one. The adhesive makes it great to get it right where you want it, but it makes it very difficult for handstitching -- just know you'll need a lot of effort to get your needle through that adhesive stuff. It's helpful if you have something grippy to hold your needle with. I used a whip stitch (good handstitching tutorial here) to tack down all the edges of the Velcro. Not a pretty job, but I used light thread and you can barely see it. :)

And that's it! Now you have this sweet little buddy to hold your needles, hooks and scissors so everything is easy to find and use...


If you like this project, leave me some comments! I'd love to hear from you.

Friday, November 11, 2011

Oh, fudge!

Now that we're quickly slipping into the holidays, I can't help but think about the wonderful homemade goodies that accompany this wonderful time of year. One of my favorites is fudge. MMmmmmmmm, fudge...


I wanted to share a great recipe I found -- a truly simple recipe. And when I say simple, I mean really, really easy. I am not a cook; in fact, I think I could burn water.


1/2 cup butter
1 cup semisweet chocolate chips
1 teaspoon vanilla extract
2 cups white sugar
1 (5 ounce) can evaporated milk
10 large marshmallows
1 cup chopped walnuts (optional)

Spray an 8x8 inch dish. Place the butter, chocolate chips and vanilla in a mixing bowl and set aside.
In a medium sauce pan, combine sugar, milk and marshmallows over medium heat. Bring to a boil, stirring frequently.
Reduce heat to low and cook for 6 minutes, stirring constantly.
*Note: When I reduced the heat, it took several minutes for my marshmallows to melt. And even though it's on a lower heat, I still had bubbles the whole time. Just make sure to keep stirring and it will turn out great!
Pour mixture over contents of mixing bowl and beat until it thickens and loses its gloss. Quickly fold in nuts if you want to include them, and pour into prepared pan. Refridgerate for a few hours before serving.

I stirred it with the butter and chocolate chips for probably about three or four minutes; it's a very subtle change when it loses its gloss. It reminds me of when soup sits for a bit and gets that kind of skin on the top -- I know, that sounds kinda gross when we're talking about delicious fudge. But you keep stirring until the fudge seems to set a bit and hold its wrinkles where you've stirred it.


This is what it looked like right after I poured it into the dish. See how it was pretty firm and held the wrinkles and ripples? Then just pop it in the fridge for a few hours and done!

Thursday, October 27, 2011

It's the best time of year...

...and no, I'm not talking about Christmas. I adore holidays of all kinds, but, besides birthdays, I have to say Halloween tops the list at our house. Come on, you get to dress up and get free candy! And yes, I do dress up (and yes, my kids get the candy, but it's so fun to watch them!).

As a craft addict, Halloween seems to be the ultimate outlet for my creativity. Plus it's an opportunity for me to tap into one of my passions: movie costumes. If somehow I could live two lives, my second life would be as a costume designer. Ah, the fabrics, the hairpieces, the jewelry, the colors, the way it all comes together to blend into the world within the movie. I love it!

So the last few weeks I've been working hard on our costumes this year, and I love the way they turned out! So please pardon while I do a little Halloween preview...

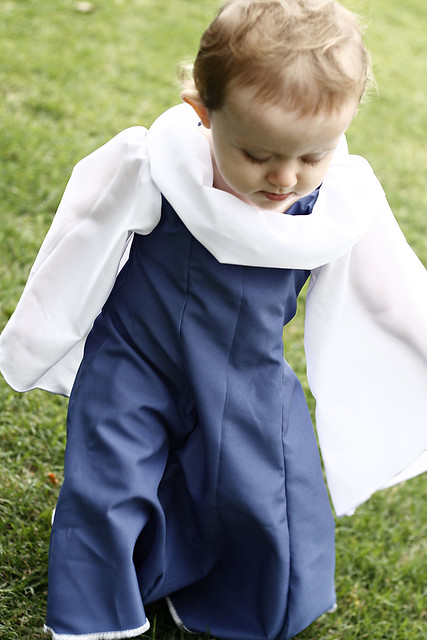
We've been Star Wars characters the last couple of years, so I felt like it was time to do something new. I already have a Lord of the Rings-ish elf costume, so I wanted to go with that this year. Since there are no cute little babies in the film, my baby gets to be a cute little elf only loosely tied to the theme.

babyelf2

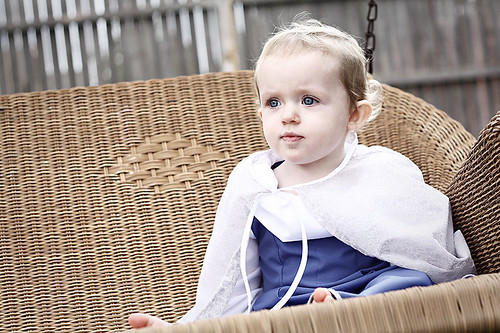
I used the same sewing pattern for both the kids -- it included some Renaissance-style dresses and a knight's outfit. I had to cut this down for my girlie; the smallest size was 3 and she's in 18 months. I did this by cutting the pieces out inside the smallest size lines, and then I used a generous seam allowance when I put it together. I then tried it on her -- it fit farely well, just had to take some extra in on the shoulder seam and consequently adjust the shoulder hole.

babyelf4

I also used my serger to make a fancy edging on the sleeves and along the bottom. It definitely cut off a lot of time trying to hem the odd shapes on Renaissance sleeves and the rounded dress.

babyelf5

I also practiced doing French seams on the sleeves and this little cloak I made. Both were sheer fabrics, so this was an elegant, professional way to do the seams without raw edges hanging out. French seams are really easy, too! I just looked it up on YouTube.

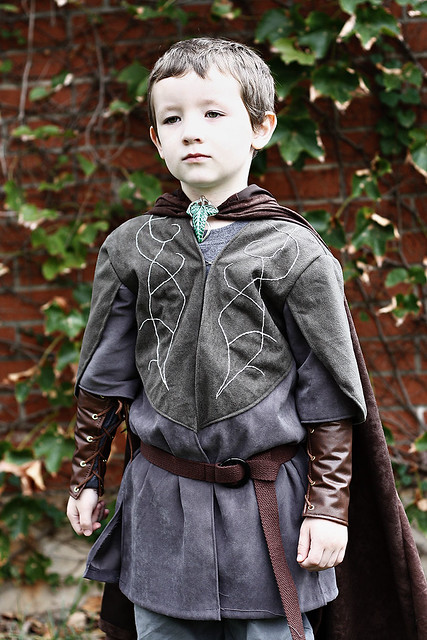
For my son, I've been wanting to make this costume for a few years. He's my favorite character from the movie!

legolas1

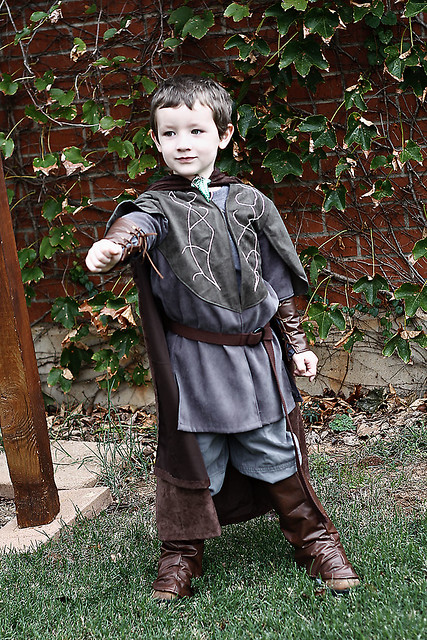
I had so much fun doing this one! The only thing he's missing is a blond wig; he does have a bow, just didn't bring it to this Halloween party.

legolas2

I used the knight's tunic pattern to make the jerkin  and simply had it open in the front instead of the back. NOTE: If you're going to do this, remember to add a little extra to the edges. Cutting it in half and then hemming along the front cut too much into tunic; luckily it was big enough, but it does pull toward that middle instead of laying with the side seams where you want them.

I then added the green parts on the front, across the back and on the sleeves. I used the same pattern to make the boot covers and put snaps on to close them in the back so I can easily adjust the size and he can wear them for a few years. The arm braces were going to be closed with velcro, but I realized I made them too small. So I used my leather punch from this tutorial, and put eyelets in evenly on both sides and laced them up with suede cord I found in the jewelry aisle at the store. I can also use the arm braces for several years because they're adjustable.

My hubby will be a ring wraith -- I'll share next week!

Tuesday, October 11, 2011

Add a little rock'n'roll to your wardrobe...

I have been on a jewelry kick lately -- I love jewelry, so why not learn to make my own? I've made a necklace and some earrings so far, and I'm definitely hooked! So much fun...

But I have to say what I've been dying for most is a punky, rock'n'roll leather cuff, and I'm so excited with the results! (Just don't look too close, it's definitely not perfect, but it was my first time working with leather...)


Yeah, I know. Not the most edgy looking with my wedding ring, but I had to wear it on that arm so I could take a picture. :) But still, I think it looks pretty awesome for my first attempt!

This was actually a pretty simple project; I did it in one afternoon. First, pick up some materials at the craft store. I saw leather and embellishments at both Hobby Lobby and Michael's. I bought a piece of leather ($3) and some embelishments ($3 to $7). Both rivets and these pyramid brads looked so much fun!


Now, this isn't the cheapest project, because you'll need more than just the materials. I also bought some snaps (and fyi, both the snaps and the rivets come with what you need to set them, you just need a hammer -- $7.50 but used a coupon), a leather hole punch (which was about $8 but I used a 40-percent coupon), and a needle/leather awl ($2). I used the awl for the pyramid cabuchons, but you will only need the leather punch for the rivets. You can make at least three or four cuffs from the leather, and you'll have leftover rivets, cabuchons and snaps. So this will be more cost effective if you make several -- hey, it's a good time to get started on Christmas presents!

So to start, you need to take some measurements and do some designing. I did a Google search and looked at leather cuffs, then designed my own with inspiration from what I found. I decided I wanted three horizontal strips and I wanted to use the pyramid cabuchons and alternate them. So plan what you want it to look like, then determine your width based on that. I decided to have each strip be 3/4 inch, so my width was 2 1/4 inches.

Measure your wrist (my wrist was 6 inches around), then add 2 inches so you'll have enough to wrap around. And believe me -- you'll need 2 inches (I tried only 1 inch and it wasn't enough). Your arm is a little bigger further up, so you need enough for the widest part of your arm, and you'll want a decent amount for placing your snaps. So my length was 8 inches. Using a rotary cutter and a straight-edge ruler, cut out your cuff (2 1/4 inches by 8 inches for mine).


Then mark any specific design elements you need to cut using a pen. I tried a pencil and it totally didn't work. You can do it on the back so you won't see it anyway, so go ahead and use the pen. I measured where to make my cuts so I could have three horizontal strips at 3/4-inch each.


See what the pencil did for me? Nothin'! My strips ended up crooked because I couldn't really see them. I just used my nice sharp scissors to make the strips. I also rounded the corners using my scissors.


Now you'll need to plan out where to put your embellishments. If you're making a hole to put the embellishment in, you can put your pen marks on the front because they'll be cut out, but if you're doing something more like these brads, I suggest you lay them out and mark it on the back.


If you're doing rivets, grab your punch and go to town. For these brad cabuchons, I used this awl. I didn't like the way the punch looked; even the smallest hole was too much of a circle for these and then it looked lumpy when I put it in. Now be so careful! This awl was super sharp! I pushed it into the leather where I wanted it and really wiggled it around to get it in. Then I flipped everything over so the base of the awl was on my matt and the leather on the top of the awl and -- carefully -- pushed the awl up through.


As you can see, this method kind of stretched my leather out. It looks all lumpy laid out, but it won't matter much when you've got it around your wrist. So get your embellishments all in place...


... then wrap it around your wrist to mark the spots for your snaps. Again, use a pen, and you'll use the leather punch here, so the pen marks will get punched out.


I just eyeballed how much I wanted it to overlap and how good it looked on my arm so I had plenty of leather to support them. Make sure to mark the holes for both ends.


I used my hole punch, making sure to get the punch that was the same size as my snaps so it had a nice, snug hole.


Then I simply followed the directions to put the snaps in, using the little setter and anvil and just a hammer I had around the house. So here's your fasteners -- and that's it!


A nice leather cuff full of attitude! Sweeeeeeeet...